
All grain brewing is a very satisfying hobby that takes a good deal of time. We need to get things right from the get go, so getting the grain ready to mash in is high up there. According to our Homebrewer technical editor Jake Brandish (in this feature from Beer & Brewer autumn) careful attention should be paid to how the grain is milled.
Give it a crack
The precious fermentable sugars in malted barley are contained inside the husk of the kernel, and we need to expose this material for conversion. Once malted, the barley becomes quite dry and brittle and will determine whether the milled malt is going to provide the brewer with a successful grist (technical term for the cracked or milled grain). This is referred to as the ‘friability’ of the malt. This is a measurement of the moisture in the kernel, and therefore its friability, or ability to be cracked open.
The maltster will pay great attention to friability. Malt that contains too much moisture will not crack open, it will simply be squashed between the rollers in the mill which leads to reduced extract. The malt goes through a malt mill to expose the starchy endosperm material in order to extract the fermentable sugars. There are many ways to do this correctly, but there are also probably more ways to do it wrong.
Size does matter
Once milled, the size of the grist particle has a huge impact on the finished beer. We do not want to pulverise and turn the malted barley into powder (or flour), but we simply want to crack the grain open to allow the brewing liquor access to convert the starchy material into fermentable sugars. Ideally, each malt kernel should be cracked into three to six individual pieces, leaving the husk intact.
High efficiency breweries using hammer mills and mash filters require that the malt be ground into a powder for maximum extract, but a homebrew system is not set up for this type of grist. Not only do we need to expose the internal part of the grain for extract purposes, but the husk of the grain should be kept intact to help form a filter bed.
Husk
As with most beans, vegetables, fruit, and brewer’s malt, the husk contains tannins and harsh bitter flavour compounds that will impart a negative flavour to the finished beer, so we do not want to extract them. One of the best ways to avoid this is to take care and get your grist production right, and not to shred the husk. These harsh compounds may also be extracted by a low pH but we are not talking about that aspect here. We only want to crack the grain open into several pieces, that way we can keep the husk intact which will aid in the filtration and clarity of the wort.
While most of the actual filtration and removal of haze-causing proteins is formed in the top layer of the mash (this layer is the grey proteinaceous layer on top of the mash called the ‘Schmutzdecke’ – German for ‘dirt layer’), the husk is crucial to the mash bed, as it allows wort and sparge liquor to flow freely through it. This will in turn give maximum extraction and improved clarity of the wort. If you are using wheat or other grains that do not have a husk, it is common practice to add rice hulls to aid in the filtration and extraction process. The picture shows nice large pieces of malt with intact husks.
Beta glucans
At a molecular level, the cell walls contain beta glucans which are directly related to viscosity and therefore the rate at which the wort can be extracted, whether recirculating or transferring to the kettle. Grinding the grain (and husk) to a flour will break down the cell walls and increase the viscosity of your wort, increasing the likelihood of the dreaded ‘stuck mash’. There is absolutely no need to shred the grain to a powder unless you are using a high efficiency mash filtration system, but as most breweries do not employ this system I doubt homebrewers will.
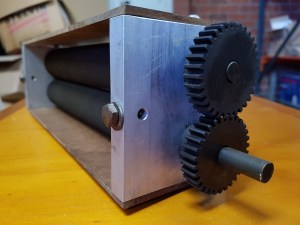
The mill
If you can, invest in a malt mill with adjustable rollers, or at least a pre-set roller gap. As your brewing gets more in-depth you will want to change the gap settings for different grains. Most homebrew malt mills are a two or three roller mill. Pay attention to the rollers, and particular attention to if they are geared, or simply spin as a result of the malt causing a floating roller to spin. This will lead to unnecessary ripping and shredding of the husk. Also pay attention to the ‘knurls’ on the roller. They should not be too raised or sharp. A geared two roller mill is ideal. Avoid mills designed for producing flour. Some brewers have been able to adjust the grinding wheels to get a good grist, but it is far too easy to get it wrong. While they may seem like a good cheap alternative they will not give you best results. I had one of these mills, and used it once and once only.
The long and short of it
When running your grain through the mill, do a short test run first to make sure you are not completely destroying the grain and husk. Try to get the malt through the mill into about three to six pieces and above all, aim to keep the husk intact. Avoid shredding and pulverising the malt into flour or you will run into flavour and processing issues.