
Home brewing is one of life’s great love-hate relationships.
We all love pouring a beer that we’ve made ourselves and sharing it with friends and family. We love experimenting and trying to make new beers that we’ve never had before. We love the smell of grains mashing in hot water and watching yeast ferment. We love thinking about the next brew.
But sometimes we hate it.
The failed batches. The frustration at the hint of an off-flavour. The effort that goes into it when it doesn’t come off. The feeling like you’re always pushing to make the beer that reaches your hopes and expectations which might blow your mind, and yet you can’t quite get there.
We’re always trying to learn and improve our methods so that we keep brewing better beers. But sometimes the beers you brew just don’t match the beers you intend.
What’s a frustrated home brewer to do?
Ah, the zeal and zen of homebrewing, the yin and yang, the pros and cons – it just makes you want to dump the keg (except maybe one more pint) and try that new recipe sometimes, doesn’t it?
It may surprise you to know that I have had many failed batches over the years. Some were bad due to off-flavours, while others were merely disappointing. Sometimes the fault was mine from failing to anticipate changes in the weather, sometimes the fault was mine from not anticipating the consequences of changes in equipment, and sometimes I made mistakes.
The point is that a bad batch happens to everyone, it is often your fault, and you just have to take it as a learning experience. But the question is, how can these mistakes and the associated agony be prevented? Ah, that is the question.
“Whether ‘tis nobler in the mind to suffer the slings and arrows of outrageous fortune, or to take arms against a sea of troubles, and by opposing end them?”
Hmmm… yeah, probably best to take a proactive approach with my top five tips for preventing those slings and arrows.
1. Measure twice, cut once
This is the most common bit of advice given to everyone, but it always bears repeating for exactly that reason. Everyone gets in a hurry and makes mistakes. Was it 50 millilitres of acid or five? Always double-check your recipe and your weights and measures. Volume measurement error is the most common cause of problems in my experience.
2. Keep it simple
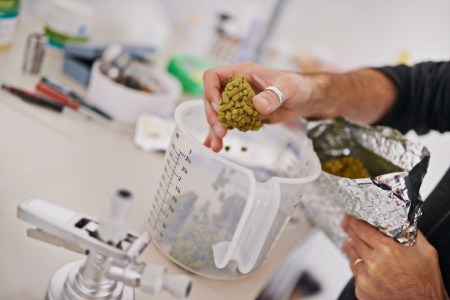
If you are like me, you are brewing for the fun of it, and getting extravagant is half the fun when it comes to designing a recipe or tricking out your brewing rig. I once spent the better part of a year and a bunch of money designing and building an automated recirculating infusion mash system that I could control from a homemade console. I had electrically-actuated valves that would switch wort flow from the pump to the different vessels. I designed the circuits and built the electronics myself (with the help of my electrical engineer wife). It was a beauty. And it mostly worked. What I hadn’t realised was that any grain or hops in the lines would clog the valves and prevent them from closing. My wort in the kettle got diluted with sparge water from the hot liquor tank as it was being pumped over from the mash tun. The message here is simpler equipment and simpler recipes can help ensure success.
3. Think out loud
Have you ever tried to explain how to do something to someone else, and in doing so, realise how incomplete or crazy it sounds? No? Well, this happens to me all the time. I often find that the best way to learn something is to try and explain it to someone else. You can do this either verbally or you can make a checklist. The point is that creating an actual procedure to follow will help identify those small details which, when forgotten, can easily turn into mistakes.
4. Improve your work area
Oh my God, the number of times I have been spinning around trying to find a clean, non-cluttered surface on which to lay a lid or a stirring spoon, or to find something I could have sworn I put right there… A cluttered and unclean work area invites misfortune. It often leads to that harbinger of calamity: “hold my beer”. Seriously, clean up your brewing area before you start. Put tools away, wipe down and clean the counters, locate all your equipment beforehand – get organised! The same goes for your fermentation area. I once attempted to carry a full glass carboy to my fermentation fridge only to see that I hadn’t cleared enough space. When I set the carboy down on the garage floor, I apparently set it down on a small but sharp pebble which proceeded to fracture said vessel and release the contents, much to my dismay.
5. Root cause analysis and the five whys
If figuring out what went wrong was easy, there wouldn’t be expensive management seminars and employee training modules to teach you how it’s done. Probably. Be that as it may, digging down to the root cause of a disappointing batch is always worthwhile. The five whys are a good tool to help you determine the root cause. It is a simple tool, you simply ask yourself why five times in order to dig down to the root cause. For example: my beer has diacetyl. Why? The beer was chilled too soon. Why? And so on.
Hopefully this intellectual exercise has helped relieve your guilt and anxiety over the occasional disappointing batch. Sometimes it helps to lower your expectations and realise that you have still made beer. Unfortunately, this has never worked for me – I always want my next batch to be better than the last.
To be completely truthful, the two biggest improvements in my rate of success have been because of tips two and four above.
But your root cause may be different from mine. So always learning and improving your methods is a good recipe for improving your success.
I can’t offer much more advice than that, other than (as a much wiser man has repeatedly said) “relax, don’t worry, have a homebrew”.
John’s Simple Dark Lager All Grain Recipe
Expected figures
OG: 1.055
FG: 1.014
ABV: 5.5%
IBU: 25
Volume: 19 litres
Ingredients
3.5kg Munich (10L) malt
1kg Munich (20L) malt
500g Caramunich III (60L) malt
250g Carafa Special I (350L) malt
35g German Tradition (6%AA)
30g German Hallertau (4%AA)
Method
1. Bring 26 litres of water to 68°C and immerse the crushed grains (in a large nylon mesh bag) and mash (steep) for 60 minutes. Stir grain occasionally to make sure all the grain is wet. After the hour, the bag is lifted out of the mash tun and allowed to drain. The wort will be (should be) 23 litres of 1.046 gravity, which should boil down to 19 litres of 1.055 gravity to go into the fermentor. No sparging is required.
2. Lift the grain bag out of the kettle and allow to drain. You should have 24 litres of 1.046 wort.
3. Bring to the boil and add the hops for the duration of the 60 minute boil.
4. Chill the wort to 15°C then transfer to your fermenter and pitch the yeast.
5. Allow the beer temperature to rise to 18°C for a diacetyl rest when the airlock bubbling begins to slow down (about day three of fermentation).
6. Let the beer rest at 18°C for at least a week after fermentation before bottling or kegging.
7. Lagering (several weeks at near freezing) is not required, although chilling the beer after the rest, before kegging, will help clarification.
8. Do not chill to clarify if you are going to be bottle conditioning. If bottling, prime and
carbonate first before chilling and serving.

John Palmer is the author of the bestselling home brew book How to Brew. In every issue of Beer & Brewer magazine he does a deep dive into a particular facet of brewing better beer and regularly provides one of his recipes. Subscribe to our magazine here.